Mastering Landscape Photography with ND Filters: A Comprehensive Guide
Landscape photography is an art form that allows us to capture the beauty and grandeur of the natural world. However, achieving the desired effect in various lighting conditions can be challenging. This is where Neutral Density (ND) filters become indispensable tools for landscape photographers. An ND filter landscape photography technique enables photographers to control light, create stunning effects, and elevate their images to a professional level. This comprehensive guide will delve into the world of ND filters, exploring their types, uses, and how they can transform your landscape photography.
Understanding ND Filters
ND filters are designed to reduce the amount of light entering the camera lens without affecting the color balance of the scene. They are essentially “sunglasses” for your camera, allowing you to use slower shutter speeds or wider apertures in bright conditions. This opens up a world of creative possibilities, especially in landscape photography.
Why Use ND Filters for Landscape Photography?
- Controlling Exposure: ND filters allow you to use slower shutter speeds in bright daylight, which is crucial for creating motion blur in clouds or water.
- Wider Apertures: By reducing the light, you can use wider apertures to achieve a shallow depth of field, isolating your subject and creating a dreamy background blur.
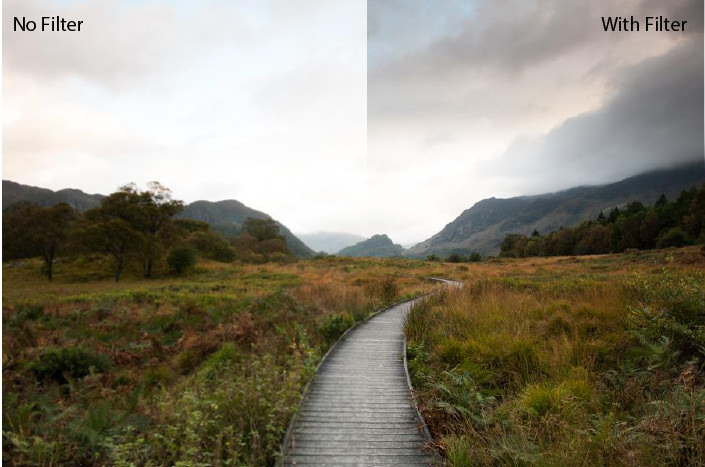
- Reducing Dynamic Range: Graduated ND filters help balance the exposure between bright skies and darker foregrounds, preventing blown-out highlights.
- Creative Effects: ND filters enable you to experiment with long exposure techniques, turning moving water into smooth, ethereal textures.
Types of ND Filters
There are several types of ND filters available, each with its own unique purpose and application. Understanding the differences between them is essential for choosing the right filter for your specific needs.
Solid ND Filters
Solid ND filters provide a uniform reduction in light across the entire frame. They are typically rated by their optical density, which determines the amount of light they block. Common ratings include ND2 (1 stop), ND4 (2 stops), ND8 (3 stops), ND64 (6 stops), and ND1000 (10 stops). The higher the number, the more light is blocked.
Solid ND filters are ideal for situations where you want to use a slower shutter speed or wider aperture in bright conditions. For example, if you want to capture the silky smooth texture of a waterfall, you would use a solid ND filter to reduce the light and allow for a longer exposure time.
Graduated ND Filters (GND)
Graduated ND filters, or GND filters, have a dark area that gradually transitions to a clear area. They are designed to balance the exposure between bright skies and darker foregrounds. The dark area is typically placed over the sky, reducing its brightness and preventing blown-out highlights, while the clear area allows the foreground to remain properly exposed.
GND filters come in various strengths and transition types. Soft-edge GND filters have a gradual transition, making them suitable for scenes with irregular horizons, such as mountains or trees. Hard-edge GND filters have a more abrupt transition, making them better suited for scenes with a clear, defined horizon, such as the ocean.
Variable ND Filters
Variable ND filters allow you to adjust the amount of light reduction by rotating the filter. They typically offer a range of stops, such as 2-8 stops or 1-5 stops. This makes them incredibly versatile, as you can quickly adjust the filter to match the lighting conditions without having to swap out different filters.
While variable ND filters are convenient, they can sometimes introduce color casts or vignetting, especially at higher densities. It’s important to choose a high-quality variable ND filter to minimize these issues. [See also: Choosing the Right Camera Gear for Landscape Photography]
Choosing the Right ND Filter
Selecting the right ND filter for your landscape photography depends on several factors, including the lighting conditions, the desired effect, and the type of scene you are shooting. Here are some tips to help you choose the right filter:
- Consider the Lighting Conditions: In bright sunlight, you will need a stronger ND filter to achieve a significant reduction in light. In overcast conditions, a weaker ND filter may suffice.
- Think About the Desired Effect: If you want to create long exposure effects, such as smooth water or blurred clouds, you will need a strong ND filter, such as an ND64 or ND1000. If you simply want to reduce the light to use a wider aperture, a weaker ND filter, such as an ND2 or ND4, may be sufficient.
- Evaluate the Scene: If the scene has a wide dynamic range, with a bright sky and a dark foreground, a graduated ND filter is essential. If the scene is evenly lit, a solid ND filter may be more appropriate.
- Quality Matters: Invest in high-quality ND filters from reputable brands. Cheap filters can introduce color casts, reduce sharpness, and cause other image quality issues.
Using ND Filters in the Field
Once you have chosen the right ND filter, it’s time to put it to use in the field. Here are some tips for using ND filters effectively in landscape photography:
Setting Up Your Camera
- Mount Your Camera on a Tripod: Long exposure photography requires a stable platform. A sturdy tripod is essential for sharp images.
- Compose Your Shot: Take your time to compose your shot carefully. Consider the foreground, middle ground, and background elements.
- Set Your Camera to Manual Mode: Manual mode gives you complete control over your aperture, shutter speed, and ISO.
- Determine Your Base Exposure: Without the ND filter, set your aperture and ISO to achieve the desired depth of field and image quality. Then, adjust your shutter speed to achieve a proper exposure.
Calculating Exposure with ND Filters
Once you have determined your base exposure, you need to calculate the adjusted exposure time with the ND filter in place. This can be done using a simple formula or a light meter app.
For example, if your base exposure is 1/60th of a second and you are using an ND64 filter (6 stops), you need to increase the exposure time by 6 stops. Each stop doubles the exposure time, so the adjusted exposure time would be:
1/60 -> 1/30 -> 1/15 -> 1/8 -> 1/4 -> 1/2 -> 1 second
Therefore, your adjusted exposure time would be 1 second.
Focusing and Metering
Before attaching the ND filter, focus on your subject using autofocus or manual focus. Once you have achieved focus, switch to manual focus to prevent the camera from refocusing when the filter is attached.
Metering can be tricky with ND filters, as the camera’s light meter may not be accurate with such a significant reduction in light. It’s best to use a handheld light meter or rely on your experience and judgment to fine-tune the exposure.
Taking the Shot
Attach the ND filter to your lens and take the shot. Review the image on your camera’s LCD screen and make any necessary adjustments to the exposure. Experiment with different shutter speeds to achieve the desired effect. [See also: Long Exposure Photography Techniques for Stunning Landscapes]
Creative Applications of ND Filters in Landscape Photography
ND filters open up a world of creative possibilities in landscape photography. Here are some examples of how you can use them to enhance your images:
Creating Motion Blur
One of the most popular uses of ND filters is to create motion blur in moving water or clouds. By using a slow shutter speed, you can turn rushing water into a silky smooth texture or create dreamy streaks in the sky.
Balancing Exposure
Graduated ND filters are essential for balancing the exposure between bright skies and darker foregrounds. This prevents blown-out highlights and ensures that the entire scene is properly exposed.
Isolating Subjects
By using a wider aperture in bright conditions, you can achieve a shallow depth of field, isolating your subject and creating a dreamy background blur. This is particularly useful for photographing flowers or other small subjects in a landscape setting.
Capturing Light Trails
In urban landscape photography, ND filters can be used to capture light trails from moving vehicles. By using a long exposure, you can turn the headlights and taillights of cars into streaks of light, adding a dynamic element to your images.
Post-Processing Tips
Even with the best ND filter techniques, some post-processing may be necessary to fine-tune your images. Here are some tips for post-processing ND filter landscape photos:
- Adjust Exposure: Make minor adjustments to the overall exposure if needed.
- Correct Color Casts: If the ND filter has introduced a color cast, use the white balance tool to correct it.
- Enhance Contrast: Adjust the contrast to add more depth and dimension to the image.
- Sharpening: Apply a moderate amount of sharpening to enhance the details.
- Remove Noise: If you used a high ISO, remove any noise from the image.
Conclusion
ND filters landscape photography is a powerful tool that can significantly enhance your landscape images. By understanding the different types of ND filters and how to use them effectively, you can control light, create stunning effects, and elevate your photography to a professional level. Whether you’re capturing the silky smooth texture of a waterfall or balancing the exposure between a bright sky and a dark foreground, ND filters are an essential part of any landscape photographer’s toolkit. So, invest in quality filters, practice your techniques, and unleash your creativity in the field.
