How to Level a Concrete Patio: A Comprehensive Guide
A sunken or uneven concrete patio can be an eyesore and a potential tripping hazard. Fortunately, you can often fix this problem yourself. This comprehensive guide will walk you through the process of how to level a concrete patio, covering everything from assessing the damage to applying the final touches. Whether you’re dealing with minor settling or more significant displacement, understanding the steps involved is crucial for achieving a safe and aesthetically pleasing outdoor space. This article will give you the tools to tackle this project yourself, making your patio a safe and enjoyable space once again.
Assessing the Damage and Determining the Cause
Before you start any leveling project, it’s essential to understand the extent of the problem and what caused it. This will help you choose the right leveling method and prevent future issues.
Inspect the Patio
Carefully examine the entire patio surface. Identify any areas that are significantly lower than others, cracks, or other signs of damage. Note the size and depth of any depressions.
Identify the Cause
Common causes of uneven concrete patios include:
- Soil Settlement: Over time, the soil beneath the patio can compact or erode, causing the concrete to sink.
- Poor Drainage: Water accumulation can weaken the soil and lead to settling.
- Tree Roots: Growing tree roots can lift and crack concrete slabs.
- Improper Installation: A poorly prepared base or inadequate concrete thickness can contribute to unevenness.
Addressing the underlying cause is crucial. For example, if poor drainage is the issue, you may need to install a drainage system before leveling the patio.
Choosing the Right Leveling Method
Several methods can be used to level a concrete patio, each with its own advantages and disadvantages. The best method depends on the severity of the unevenness and the type of damage.
Mudjacking (Slab Jacking)
Mudjacking involves pumping a mixture of mud, cement, and other materials under the concrete slab to lift it back into place. This method is suitable for larger voids and significant settling.
Pros:
- Relatively inexpensive compared to replacing the concrete.
- Can lift large slabs.
- Fills voids beneath the concrete.
Cons:
- Requires specialized equipment and expertise.
- Can be messy.
- The mudjacking material can shrink over time, potentially leading to future settling.
Slab Leveling with Polyurethane Foam
This method is similar to mudjacking, but instead of mud, polyurethane foam is injected under the slab. The foam expands and lifts the concrete.
Pros:
- Lightweight and durable.
- Doesn’t shrink or erode over time.
- Fills voids effectively.
Cons:
- More expensive than mudjacking.
- Requires specialized equipment and expertise.
Self-Leveling Concrete
Self-leveling concrete is a cement-based mixture that flows easily and levels itself. This method is suitable for minor unevenness and can be used to create a smooth surface for tiling or other finishes.
Pros:
- Easy to apply.
- Creates a smooth, even surface.
- Can be used to cover minor cracks and imperfections.
Cons:
- Not suitable for large voids or significant settling.
- Can be expensive for large areas.
- Requires careful surface preparation.
Mortar or Concrete Patching
For small, localized depressions, you can use mortar or concrete patching compound to fill in the low spots. This is a simple and cost-effective solution for minor imperfections.
Pros:
- Inexpensive and easy to apply.
- Suitable for small repairs.
- Can be used to fill cracks and chips.
Cons:
- Not suitable for large areas or significant settling.
- May not blend perfectly with the existing concrete.
Step-by-Step Guide to Leveling a Concrete Patio with Self-Leveling Concrete
This section will provide a detailed guide on how to level a concrete patio using self-leveling concrete. This method is ideal for patios with minor unevenness.
Materials and Tools Needed
- Self-leveling concrete mix
- Mixing bucket
- Drill with mixing paddle
- Concrete primer
- Squeegee or gauge rake
- Level
- Measuring tape
- Safety glasses
- Gloves
- Shop vacuum
- Concrete grinder (optional, for surface preparation)
Preparation
- Clean the Surface: Thoroughly clean the patio surface with a shop vacuum to remove dirt, debris, and loose particles. Power washing can also be helpful.
- Repair Cracks and Chips: Fill any cracks or chips with concrete patching compound and allow it to dry completely.
- Grind High Spots (Optional): If there are any high spots on the patio, use a concrete grinder to level them out.
- Apply Concrete Primer: Apply a concrete primer to the entire surface according to the manufacturer’s instructions. This will help the self-leveling concrete adhere properly.
- Determine the Level: Use a level to determine the highest point on the patio. This will be your reference point for leveling.
- Calculate the Amount of Self-Leveling Concrete Needed: Measure the area of the patio and the depth of the low spots. Use the manufacturer’s instructions to calculate how much self-leveling concrete you will need. It’s always a good idea to buy a little extra to account for variations in depth.
Mixing the Self-Leveling Concrete
- Follow the Manufacturer’s Instructions: Carefully read and follow the manufacturer’s instructions for mixing the self-leveling concrete. The water-to-mix ratio is crucial for achieving the desired consistency.
- Mix Thoroughly: Use a drill with a mixing paddle to mix the self-leveling concrete in a large mixing bucket. Mix until the mixture is smooth and lump-free.
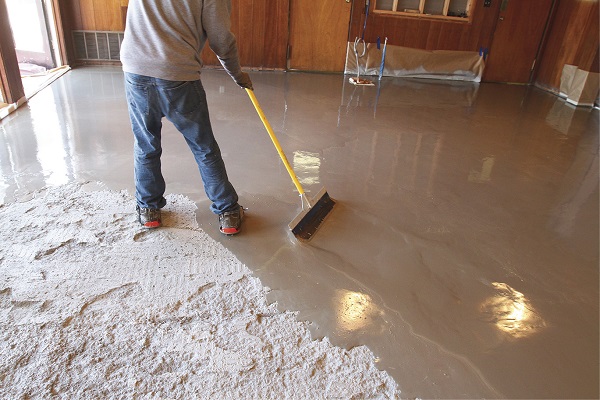
Applying the Self-Leveling Concrete
- Pour the Mixture: Pour the self-leveling concrete onto the patio, starting at the deepest low spots.
- Spread the Mixture: Use a squeegee or gauge rake to spread the mixture evenly across the patio. Work quickly, as self-leveling concrete can start to set relatively quickly.
- Ensure Even Coverage: Pay close attention to ensure that the self-leveling concrete covers all the low spots and creates a smooth, even surface.
- Remove Air Bubbles: Use a spiked roller to remove any air bubbles that may be trapped in the mixture.
Curing
- Allow to Cure: Allow the self-leveling concrete to cure according to the manufacturer’s instructions. This typically takes 24-72 hours.
- Keep the Surface Moist: To prevent cracking, keep the surface moist during the curing process by covering it with plastic sheeting or spraying it with water periodically.
Alternative Methods for Minor Unevenness
While self-leveling concrete is a great option, other methods can be effective for addressing minor unevenness in a concrete patio.
Using Mortar or Concrete Patching Compound
For very small dips or localized imperfections, mortar or concrete patching compound can be used. Clean the area thoroughly, dampen it slightly, and apply the patching compound with a trowel. Smooth it out to match the surrounding surface and allow it to cure. This method is best suited for filling small cracks or chips and addressing minor surface irregularities.
Surface Grinding
If the unevenness is due to slight variations in the concrete surface itself, a concrete grinder can be used to smooth out the high spots. This requires a specialized tool and some experience, but it can be an effective way to achieve a level surface without adding any additional material.
Preventing Future Problems
Once you’ve successfully leveled your concrete patio, it’s important to take steps to prevent future problems. Here are some tips:
- Improve Drainage: Ensure that water drains away from the patio. Consider installing a drainage system if necessary.
- Maintain the Soil: Avoid planting trees or shrubs too close to the patio, as their roots can cause damage.
- Seal the Concrete: Apply a concrete sealer to protect the surface from water damage and staining.
- Regular Inspections: Regularly inspect the patio for cracks or other signs of damage and address them promptly.
When to Call a Professional
While many concrete patio leveling projects can be tackled DIY, there are situations where it’s best to call a professional. These include:
- Significant Settling: If the patio has settled significantly or there are large voids beneath the concrete, mudjacking or slab leveling with polyurethane foam may be necessary. These methods require specialized equipment and expertise.
- Extensive Damage: If the patio is severely cracked or damaged, it may be more cost-effective to replace it rather than attempt to level it.
- Unsure of the Cause: If you’re unsure of the cause of the unevenness, a professional can assess the situation and recommend the best course of action.
Conclusion
How to level a concrete patio is a project that can significantly improve the appearance and safety of your outdoor space. By understanding the different leveling methods and following the steps outlined in this guide, you can achieve professional-looking results. Remember to assess the damage, choose the right method, and take steps to prevent future problems. Whether you opt for self-leveling concrete, mudjacking, or another method, a level patio will provide years of enjoyment. Don’t forget to prioritize safety throughout the project and consider consulting with a professional if you’re unsure about any aspect of the process. Now that you know how to level a concrete patio, you can start improving your outdoor living space today! [See also: Concrete Patio Repair Guide] [See also: Choosing the Right Concrete Sealer]
