How to Change User Agent in Chrome: A Comprehensive Guide
In the digital landscape, websites often tailor their content based on the user’s browser and operating system. This is achieved by analyzing the user agent, a string of text sent by your browser to the server. While the default user agent provides essential information, there are scenarios where modifying it becomes necessary. This article delves into the intricacies of how to change user agent in Chrome, exploring the reasons behind it, the methods involved, and the potential implications.
Understanding the User Agent
The user agent is essentially your browser’s way of introducing itself to the websites you visit. It contains details such as the browser name, version, operating system, and sometimes even device information. This data allows websites to optimize content delivery, ensuring compatibility and a seamless user experience. For instance, a website might serve a different version of its mobile site to a user with an Android device compared to a desktop user with Windows.
However, there are situations where the standard user agent can be limiting or even problematic. This is where the ability to change user agent in Chrome becomes valuable.
Why Change User Agent in Chrome?
Several reasons might prompt you to change user agent in Chrome. Here are some common scenarios:
- Website Compatibility Testing: Developers often use user agent switching to test how their websites render on different browsers and devices. This ensures a consistent and functional experience across various platforms.
- Accessing Mobile Sites on Desktop: Sometimes, you might prefer the mobile version of a website, even when browsing on a desktop. Changing the user agent allows you to trick the website into serving the mobile version.
- Bypassing Browser Restrictions: In rare cases, a website might block certain browsers or versions. By modifying the user agent, you can potentially bypass these restrictions.
- Privacy Concerns: While not a primary privacy measure, some users change user agent in Chrome as a way to obfuscate their browser identity, making it slightly harder to track their browsing activity.
- Troubleshooting Website Issues: If a website is displaying incorrectly or malfunctioning, changing the user agent can help determine if the issue is browser-specific.
Methods to Change User Agent in Chrome
There are several methods available to change user agent in Chrome, ranging from simple extensions to more technical approaches using developer tools.
Using Chrome Developer Tools
Chrome’s built-in Developer Tools provide a powerful and convenient way to modify the user agent. This method is ideal for developers and users who need temporary changes for testing or troubleshooting.
- Open Developer Tools: Right-click anywhere on the webpage and select “Inspect” or press Ctrl+Shift+I (Windows/Linux) or Cmd+Option+I (macOS).
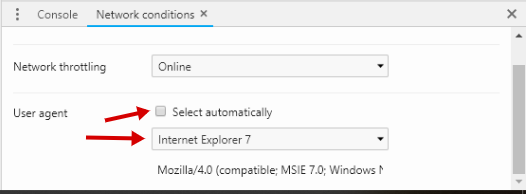
- Access the Network Conditions Tab: In the Developer Tools panel, click on the three vertical dots (More tools) in the top right corner and select “Network conditions”. Alternatively, you might find the “Network” tab directly, where you can find “Network conditions” at the bottom.
- Disable “Use browser default”: Under the “User agent” section, uncheck the box labeled “Use browser default”.
- Select a Predefined User Agent: Choose from the dropdown menu of predefined user agents (e.g., Chrome on Android, Safari on iOS).
- Enter a Custom User Agent: If you need a specific user agent, you can enter it manually in the text field.
- Reload the Page: Refresh the webpage to apply the new user agent.
This method only changes the user agent for the current tab. Once you close the tab or Developer Tools, the user agent reverts to the default.
Using Chrome Extensions
Numerous Chrome extensions are available that simplify the process of changing the user agent. These extensions offer a user-friendly interface and often provide additional features, such as saving custom user agents and switching between them easily. Here are a few popular options:
- User-Agent Switcher and Manager: This extension allows you to quickly switch between a variety of predefined user agents and add your own custom agents.
- User-Agent Switcher: A simpler extension with a focus on ease of use, providing a straightforward way to select from a list of common user agents.
- Custom UserAgent String: Offers a high degree of customization, allowing you to define complex user agent strings and manage them effectively.
To use a Chrome extension:
- Install the Extension: Search for the desired extension in the Chrome Web Store and click “Add to Chrome”.
- Access the Extension: Once installed, the extension icon will appear in the Chrome toolbar.
- Select a User Agent: Click the extension icon and choose a predefined user agent or enter a custom one.
- Apply the Changes: The extension will typically apply the changes automatically. You may need to refresh the webpage.
Chrome extensions offer a persistent solution for change user agent in Chrome, meaning the user agent will remain modified until you disable or uninstall the extension.
Using Command-Line Flags (Advanced)
For advanced users, it’s possible to change user agent in Chrome by using command-line flags when launching the browser. This method is more technical and requires familiarity with command-line interfaces.
- Close All Chrome Instances: Ensure that all instances of Chrome are closed before proceeding.
- Open the Command Line: Open the Command Prompt (Windows) or Terminal (macOS/Linux).
- Launch Chrome with the `–user-agent` Flag: Use the following command, replacing `”Your Custom User Agent String”` with the desired user agent string:
`chrome –user-agent=”Your Custom User Agent String”`
For example:
`chrome –user-agent=”Mozilla/5.0 (iPhone; CPU iPhone OS 14_0 like Mac OS X) AppleWebKit/605.1.15 (KHTML, like Gecko) Version/14.0 Mobile/15E148 Safari/604.1″`
This method launches a new instance of Chrome with the specified user agent. The changes will only apply to this instance. This is a less commonly used method to change user agent in Chrome due to its complexity.
Potential Implications of Changing User Agent
While changing the user agent can be useful, it’s important to be aware of the potential implications:
- Website Compatibility Issues: Some websites may not function correctly if they detect an unexpected or unsupported user agent.
- Incorrect Content Delivery: Websites might serve the wrong version of content if the user agent doesn’t accurately reflect the user’s device or browser.
- Security Risks: While changing the user agent itself doesn’t directly pose a security risk, using untrusted or malicious user agent strings could potentially expose you to vulnerabilities.
- Fingerprinting: Modern websites use many techniques to fingerprint users. Changing the user agent alone will not hide your activity.
Best Practices for Changing User Agent
To minimize potential issues, follow these best practices when you change user agent in Chrome:
- Use Reputable Extensions: Choose Chrome extensions from trusted developers with positive reviews.
- Test Thoroughly: After changing the user agent, test the websites you visit to ensure they are functioning correctly.
- Revert to Default When Finished: When you no longer need the modified user agent, revert to the default setting to avoid unexpected behavior.
- Be Aware of Fingerprinting: Understand that changing the user agent is not a foolproof method for anonymity or privacy.
Conclusion
The ability to change user agent in Chrome is a valuable tool for developers, testers, and users who need to customize their browsing experience. Whether you’re testing website compatibility, accessing mobile sites on desktop, or troubleshooting browser issues, understanding how to modify the user agent can be incredibly useful. By following the methods outlined in this guide and adhering to best practices, you can effectively change user agent in Chrome while minimizing potential risks and ensuring a smooth browsing experience. Remember to always prioritize security and revert to the default user agent when you’re finished with your specific task. [See also: Understanding Browser Fingerprinting] [See also: Chrome Extensions for Web Developers]
