How to Change to Landscape in Word: A Comprehensive Guide
Microsoft Word is a powerful tool for creating documents, but sometimes the default portrait orientation just doesn’t cut it. Whether you’re working on a brochure, a wide chart, or a visually appealing presentation, knowing how to change to landscape in Word is an essential skill. This guide will walk you through the process step-by-step, covering various scenarios and offering troubleshooting tips. We’ll explore different methods for changing page orientation, including applying it to the entire document or specific sections. So, let’s dive in and learn how to change to landscape in Word effectively.
Understanding Page Orientation in Word
Before we get into the how-to, let’s briefly discuss the concept of page orientation. In Word, you primarily have two options: portrait and landscape. Portrait is the default, where the page is taller than it is wide. Landscape, on the other hand, is wider than it is tall. Choosing the right orientation depends on the content you’re presenting and the overall visual appeal you’re aiming for. Knowing how to change to landscape in Word allows for greater flexibility in document design. It can significantly improve the readability and presentation of tables, figures, and other wide elements.
Changing the Entire Document to Landscape
The simplest scenario is when you want to apply landscape orientation to the entire document. Here’s how to do it:
- Open your Microsoft Word document.
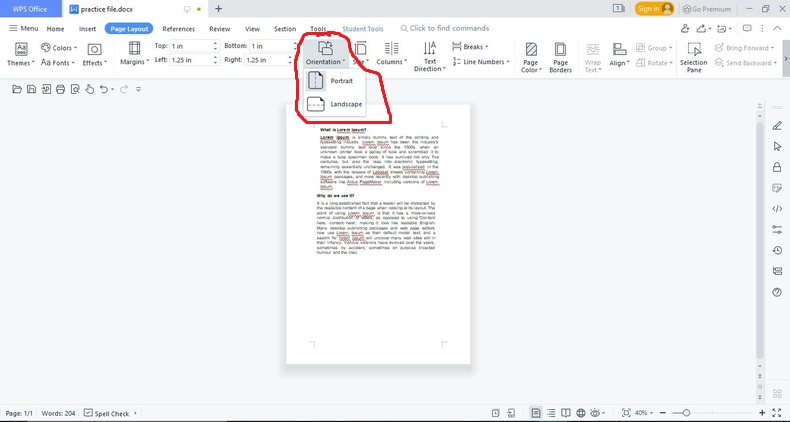
- Click on the “Layout” tab (or “Page Layout” in older versions of Word).
- In the “Page Setup” group, click on “Orientation”.
- Select “Landscape”.
That’s it! The entire document should now be in landscape orientation. This method is straightforward and works well for documents where all pages benefit from the wider format. However, what if you only need a portion of your document in landscape? Let’s explore that next. Using this method to change to landscape in Word is the easiest and fastest.
Changing Specific Sections to Landscape
Often, you’ll need to mix portrait and landscape orientations within the same document. This is particularly useful for including wide tables or charts without affecting the rest of your document’s layout. Here’s how to change specific sections to landscape:
Inserting Section Breaks
Section breaks are crucial for applying different formatting options to different parts of your document. Here’s how to insert them:
- Place your cursor at the end of the page *before* the page you want to change to landscape.
- Click on the “Layout” tab (or “Page Layout”).
- In the “Page Setup” group, click on “Breaks”.
- Under “Section Breaks”, choose “Next Page”. This will create a new section starting on the next page.
- Repeat the process after the last page you want in landscape to return to portrait.
By inserting these section breaks, you’re essentially dividing your document into independent sections that can have different formatting. It’s a fundamental step when you want to change to landscape in Word for only a portion of your document.
Applying Landscape Orientation to the Section
Now that you have your section breaks in place, you can apply landscape orientation to the desired section:
- Click anywhere within the section you want to change to landscape.
- Go to the “Layout” tab (or “Page Layout”).
- In the “Page Setup” group, click on “Orientation”.
- Select “Landscape”.
Only the selected section will now be in landscape orientation, while the rest of your document remains in portrait. This method provides precise control over page orientation, allowing you to seamlessly integrate landscape pages within a portrait document. Knowing how to change to landscape in Word using section breaks is a vital skill for creating professional-looking documents.
Using the Page Setup Dialog Box
Another way to change page orientation is through the Page Setup dialog box. This method offers more granular control over various page settings, including orientation, margins, and paper size. Here’s how to use it:
- Click on the “Layout” tab (or “Page Layout”).
- In the “Page Setup” group, click on the small arrow in the bottom-right corner. This will open the Page Setup dialog box.
- Go to the “Margins” tab.
- Under “Orientation”, select either “Portrait” or “Landscape”.
- In the “Apply to” dropdown, choose whether to apply the change to the “Whole document” or “This section”.
- Click “OK”.
This method is particularly useful when you want to fine-tune other page settings along with the orientation. The “Apply to” option allows you to target specific sections or the entire document, providing flexibility in managing page layout. Mastering this technique enhances your ability to change to landscape in Word with precision.
Troubleshooting Common Issues
Sometimes, changing page orientation in Word doesn’t go as smoothly as planned. Here are some common issues and how to troubleshoot them:
- Incorrect Section Breaks: If the orientation change affects more or fewer pages than intended, double-check your section breaks. Make sure they are placed correctly at the beginning and end of the section you want to change.
- Applying to the Wrong Section: Ensure you’ve clicked within the correct section before changing the orientation. Word applies the change to the active section, so clicking in the wrong place can lead to unexpected results.
- Printer Settings: In rare cases, printer settings can override Word’s orientation settings. Check your printer settings to ensure they are not forcing a particular orientation.
- Corrupted Document: If you’re experiencing persistent issues, the document might be corrupted. Try copying the content to a new Word document to see if that resolves the problem.
By addressing these common issues, you can ensure a smooth and successful experience when you change to landscape in Word. If problems persist, consult Microsoft Word’s help documentation or online forums for further assistance.
Tips for Effective Landscape Use
Once you know how to change to landscape in Word, here are a few tips to make the most of it:
- Optimize Content for Landscape: When using landscape, ensure your content is optimized for the wider format. This might involve adjusting table widths, image sizes, and font sizes to fill the space effectively.
- Use Landscape for Visual Elements: Landscape orientation is particularly well-suited for displaying visual elements like charts, graphs, and large images. Use it strategically to enhance the visual appeal of your document.
- Maintain Consistency: While mixing portrait and landscape can be effective, avoid overusing it. Maintain a consistent layout throughout your document to avoid confusing the reader.
- Consider the Audience: Think about how your audience will be viewing the document. If it’s primarily for on-screen viewing, landscape can be a good choice. If it’s primarily for printing, consider how the landscape pages will be handled.
By following these tips, you can leverage the power of landscape orientation to create more engaging and effective documents. The ability to change to landscape in Word is a valuable asset in document design.
Alternative Methods and Considerations
While the methods described above are the most common, there are alternative approaches to consider. For instance, you can use different page sizes within the same document to achieve a similar effect. You can also embed objects from other applications, such as Excel charts, which might have their own orientation settings. Furthermore, when collaborating on documents, be mindful of how different versions of Word handle page orientation. Compatibility issues can sometimes arise, especially when working with older file formats. Understanding these nuances will help you navigate complex document formatting scenarios and effectively change to landscape in Word as needed. Always save your work frequently to avoid losing any changes.
Conclusion
Knowing how to change to landscape in Word is a fundamental skill for anyone who works with documents regularly. Whether you need to apply it to the entire document or specific sections, the methods outlined in this guide will empower you to create visually appealing and effective layouts. By mastering section breaks, the Page Setup dialog box, and troubleshooting common issues, you’ll be well-equipped to handle any page orientation challenge that comes your way. Remember to optimize your content for landscape, maintain consistency, and consider your audience to create documents that truly stand out. So go ahead, experiment with landscape orientation, and unlock the full potential of Microsoft Word. With practice, you’ll be able to seamlessly integrate portrait and landscape pages, creating professional-quality documents that meet your specific needs. Learning how to change to landscape in Word opens up a world of possibilities for document design and presentation.
[See also: How to Insert Section Breaks in Word]
[See also: How to Change Margins in Word]
[See also: How to Format Tables in Word]
