How to Build a Freestanding Patio Cover: A Comprehensive Guide
Creating an outdoor oasis is a dream for many homeowners, and a freestanding patio cover is a fantastic way to achieve this. A well-built patio cover not only provides shade and protection from the elements but also adds significant value and aesthetic appeal to your property. This comprehensive guide will walk you through the process of how to build a freestanding patio cover, from planning and preparation to construction and finishing touches. Whether you’re a seasoned DIY enthusiast or a beginner, this step-by-step approach will help you create a stunning and functional outdoor space.
Planning and Preparation
Permits and Regulations
Before you even think about picking up a hammer, it’s crucial to check your local building codes and regulations. Many municipalities require permits for structures like patio covers. Contact your local building department to understand the specific requirements in your area. This might involve submitting plans, obtaining inspections, and adhering to setback requirements. Ignoring this step could lead to fines or even the forced removal of your structure. Make sure you understand the requirements for how to build a freestanding patio cover legally.
Design and Materials
The design of your freestanding patio cover will significantly impact its functionality and appearance. Consider the size and shape of your patio, the amount of shade you desire, and the overall aesthetic you’re aiming for. Common materials include wood, aluminum, and vinyl. Wood offers a classic, natural look, while aluminum and vinyl are more durable and require less maintenance. Choose materials that complement your home’s existing architecture and withstand your local climate. Think about the style you prefer, whether it’s a simple pergola, a solid roof, or something in between. Plan your design carefully before starting to consider how to build a freestanding patio cover.
Tools and Equipment
Having the right tools and equipment is essential for a successful patio cover project. Here’s a list of some of the basics you’ll need:
- Measuring tape
- Level
- Post hole digger or auger
- Concrete mix
- Circular saw
- Drill/driver
- Hammer
- Safety glasses
- Gloves
- Ladders
- Fasteners (screws, nails, bolts)
Depending on your design and materials, you may need additional tools. Renting specialized equipment, like an auger, can save time and effort. Ensure you have all the necessary safety gear to protect yourself during the construction process. Being well-equipped is crucial when learning how to build a freestanding patio cover.
Construction Steps
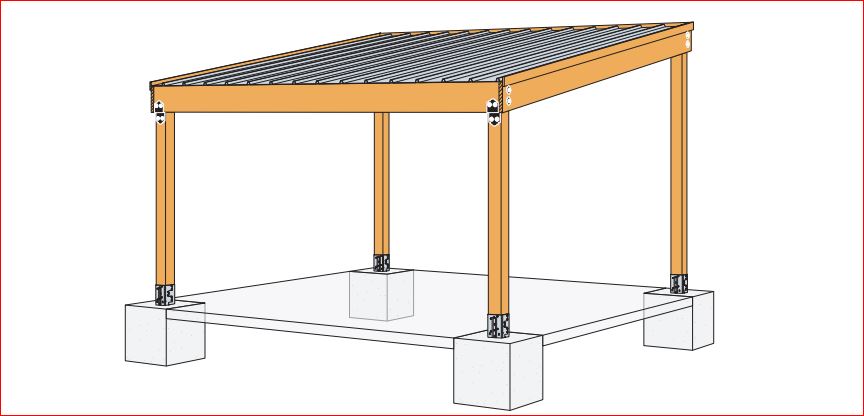
Setting the Posts
The foundation of your patio cover is the posts. Carefully measure and mark the locations for your posts, ensuring they are evenly spaced and aligned. Use a post hole digger or auger to create holes that are deep enough to extend below the frost line in your area. This will prevent the posts from shifting due to freezing and thawing. Place the posts in the holes and use concrete to secure them in place. Make sure the posts are plumb (perfectly vertical) before the concrete sets. This step is paramount for a stable and long-lasting structure. Understanding post placement is essential to how to build a freestanding patio cover.
Building the Frame
Once the posts are set, you can begin building the frame. This typically involves attaching beams to the tops of the posts to create a sturdy framework. Use strong fasteners, such as bolts or lag screws, to connect the beams to the posts. Ensure the frame is level and square before proceeding. The frame provides the structural support for the rest of the patio cover, so it’s important to get it right. Take your time and double-check your measurements. The frame is the core of how to build a freestanding patio cover.
Adding the Roofing Material
The roofing material will depend on your design and preferences. For a simple pergola, you might use lattice or open beams. For a solid roof, you can use wood, metal, or composite roofing panels. Install the roofing material according to the manufacturer’s instructions. Ensure that the roofing is properly secured and waterproof to protect your patio from the elements. Consider the weight of the roofing material when selecting your frame and post sizes. Proper roofing installation is key to how to build a freestanding patio cover that lasts.
Finishing Touches
Once the main structure is complete, you can add finishing touches to enhance the appearance and functionality of your patio cover. This might include adding decorative trim, painting or staining the wood, installing lighting, or adding screens for insect protection. Consider adding gutters to divert rainwater away from your patio. Personalize your patio cover to reflect your style and create a comfortable and inviting outdoor space. These details enhance the overall look and feel of how to build a freestanding patio cover.
Tips for Success
- Plan carefully: A well-thought-out plan is essential for a successful project.
- Use quality materials: Investing in quality materials will ensure your patio cover lasts for years to come.
- Take your time: Don’t rush the process. Accuracy and attention to detail are key.
- Get help if needed: Don’t be afraid to ask for help from friends, family, or professionals.
- Prioritize safety: Always wear safety glasses and gloves when working with power tools.
Maintaining Your Patio Cover
Regular maintenance will help keep your patio cover in good condition and extend its lifespan. Inspect the structure regularly for signs of damage, such as cracks, rot, or loose fasteners. Clean the patio cover periodically to remove dirt, leaves, and other debris. Apply a sealant or stain to protect the wood from the elements. Address any issues promptly to prevent them from escalating. Proper maintenance is crucial for how to build a freestanding patio cover that lasts for years.
Benefits of a Freestanding Patio Cover
A freestanding patio cover offers numerous benefits, including:
- Shade and protection: Provides shade from the sun and protection from rain and snow.
- Increased property value: Adds value to your home and makes it more attractive to potential buyers.
- Enhanced outdoor living space: Creates a comfortable and inviting outdoor space for relaxing and entertaining.
- Versatility: Can be used for a variety of purposes, such as dining, lounging, or gardening.
- Aesthetic appeal: Enhances the appearance of your property and complements your home’s architecture.
Building a freestanding patio cover is a rewarding project that can transform your outdoor space. By following these steps and tips, you can create a beautiful and functional patio cover that you’ll enjoy for years to come. Remember to research local regulations and prioritize safety throughout the construction process. Understanding how to build a freestanding patio cover will bring years of enjoyment.
Common Mistakes to Avoid
Even with careful planning, some common mistakes can derail your patio cover project. Here are a few to watch out for:
- Incorrect measurements: Double-check all measurements before cutting materials.
- Poor post placement: Ensure posts are plumb and properly anchored.
- Inadequate support: Use the correct size and type of materials to support the weight of the roof.
- Improper drainage: Slope the roof to allow for proper water runoff.
- Ignoring building codes: Always obtain the necessary permits and follow local regulations.
Avoiding these common mistakes will help ensure a successful and long-lasting patio cover. Learning from others’ errors is part of understanding how to build a freestanding patio cover correctly.
Alternative Patio Cover Options
While this guide focuses on freestanding patio covers, several other options are available, each with its own advantages and disadvantages. Consider these alternatives before making a final decision:
- Attached patio covers: These are connected to your house, providing a seamless transition between indoor and outdoor living spaces.
- Pergolas: These offer partial shade and are often used for decorative purposes.
- Awnings: These are retractable covers that can be adjusted to provide varying degrees of shade.
- Gazebos: These are freestanding structures with a solid roof, offering complete protection from the elements.
Each option has its own cost, complexity, and aesthetic appeal. Weigh the pros and cons of each before deciding which is right for you. Understanding these alternatives gives a broader perspective on how to build a freestanding patio cover compared to other structures.
Conclusion
Building a freestanding patio cover is a significant undertaking, but the rewards are well worth the effort. With careful planning, quality materials, and attention to detail, you can create a beautiful and functional outdoor space that you’ll enjoy for years to come. Remember to prioritize safety and follow local building codes. Now that you have a comprehensive understanding of how to build a freestanding patio cover, you can confidently embark on your project and transform your backyard into a relaxing and inviting oasis. [See also: Patio Cover Design Ideas] [See also: Best Materials for Patio Covers] [See also: Patio Cover Installation Tips]
