Delta Faucets: How to Repair Common Issues and Extend Their Lifespan
Delta faucets are renowned for their durability and stylish designs, making them a popular choice for homeowners. However, like all plumbing fixtures, they can experience issues over time. Understanding how to repair common problems with your Delta faucet can save you money on costly plumbing repairs and extend the lifespan of your fixture. This comprehensive guide will walk you through the steps necessary to diagnose and fix common Delta faucet issues, ensuring your Delta faucet continues to function smoothly for years to come. We’ll cover everything from identifying the problem to gathering the necessary tools and completing the repair.
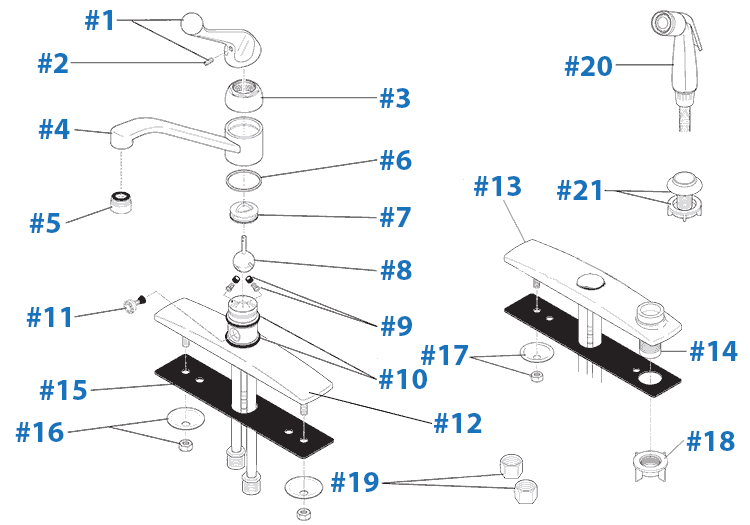
Identifying Common Delta Faucet Problems
Before diving into repairs, it’s crucial to accurately identify the problem. Common issues with Delta faucets include:
- Dripping Faucet: A persistent drip can waste water and indicate a worn-out valve, cartridge, or O-ring.
- Low Water Pressure: This could be due to a clogged aerator, debris in the faucet body, or issues with the water supply.
- Leaky Faucet Handle: Water leaking around the handle often points to a worn-out O-ring or cartridge.
- Stiff or Difficult Handle Operation: Mineral buildup or a corroded cartridge can make the handle hard to move.
- No Hot or Cold Water: This could indicate a problem with the cartridge or the water supply lines.
Once you’ve identified the problem, you can proceed with the appropriate repair. Knowing the specific model of your Delta faucet will also be extremely helpful when ordering replacement parts or consulting online resources.
Gathering the Necessary Tools and Materials
Having the right tools and materials on hand will make the repair process much smoother. Here’s a list of essential items:
- Adjustable Wrench: For loosening and tightening nuts and fittings.
- Screwdrivers (Phillips and Flathead): To remove screws and access internal components.
- Allen Wrench Set: Many Delta faucets use Allen screws to secure handles and other parts.
- Pliers: For gripping and manipulating small parts.
- Basin Wrench: Useful for reaching nuts in tight spaces under the sink.
- Plumber’s Grease: To lubricate O-rings and cartridges for smooth operation.
- White Vinegar: For soaking and cleaning mineral deposits.
- Replacement Parts: Cartridges, O-rings, seats, and springs specific to your Delta faucet model.
- Clean Rags or Towels: To wipe up spills and protect surfaces.
Before starting any repair, always turn off the water supply to the faucet. This is usually done by closing the shut-off valves located under the sink. If you don’t have shut-off valves, you’ll need to turn off the main water supply to your house.
Step-by-Step Repair Guides for Common Delta Faucet Issues
Repairing a Dripping Delta Faucet
A dripping Delta faucet is a common problem that can usually be fixed by replacing the cartridge or valve. Here’s how:
- Turn off the water supply: As mentioned earlier, shut off the water supply to the faucet.
- Remove the handle: Depending on the model, you may need to loosen a set screw with an Allen wrench or unscrew a decorative cap to access the handle screw.
- Remove the cartridge retaining clip: Use pliers or a screwdriver to carefully remove the clip that holds the cartridge in place.
- Remove the old cartridge: Use pliers to grip and pull out the old cartridge. It may be stiff, so apply steady pressure.
- Install the new cartridge: Lubricate the new cartridge with plumber’s grease and insert it into the faucet body. Make sure it’s properly aligned.
- Reinstall the retaining clip: Secure the new cartridge with the retaining clip.
- Reattach the handle: Reinstall the handle and tighten the set screw or handle screw.
- Turn on the water supply: Slowly turn on the water supply and check for leaks.
Fixing Low Water Pressure in a Delta Faucet
Low water pressure can be frustrating. Here’s how to troubleshoot and fix it in your Delta faucet:
- Check the aerator: The aerator is the screen at the tip of the faucet. Unscrew it and clean away any mineral deposits or debris. Soak it in white vinegar if necessary.
- Inspect the faucet body: If the aerator is clean, check the faucet body for any blockages. You may need to disassemble the faucet to access and clean internal components.
- Check the water supply lines: Make sure the water supply lines are not kinked or blocked.
- Consider a pressure regulator: If the problem persists, you may have low water pressure throughout your house, which could require a pressure regulator.
Addressing a Leaky Delta Faucet Handle
A leaky handle usually indicates a worn-out O-ring or cartridge. Here’s how to address it:
- Turn off the water supply: Shut off the water supply to the faucet.
- Remove the handle: Follow the steps for removing the handle as described above.
- Inspect the O-rings: Check the O-rings on the handle and cartridge for wear or damage. Replace them if necessary.
- Replace the cartridge: If the O-rings look fine, the cartridge may be the problem. Replace it as described above.
- Reassemble the faucet: Reinstall the handle and turn on the water supply.
Dealing with a Stiff or Difficult Delta Faucet Handle
A stiff handle can be caused by mineral buildup or a corroded cartridge. Here’s how to resolve it:
- Turn off the water supply: Shut off the water supply to the faucet.
- Remove the handle: Follow the steps for removing the handle as described above.
- Clean the cartridge: Remove the cartridge and soak it in white vinegar to dissolve mineral deposits.
- Lubricate the cartridge: Apply plumber’s grease to the cartridge before reinstalling it.
- Replace the cartridge: If cleaning and lubrication don’t help, replace the cartridge.
- Reassemble the faucet: Reinstall the handle and turn on the water supply.
Restoring Hot or Cold Water Flow to a Delta Faucet
If your Delta faucet isn’t delivering hot or cold water, here’s what to check:
- Check the water supply lines: Make sure both hot and cold water supply lines are open and not blocked.
- Inspect the cartridge: A faulty cartridge can prevent hot or cold water from flowing. Replace the cartridge if necessary.
- Check the temperature settings: Some Delta faucets have temperature limiters. Make sure these are properly adjusted.
Preventative Maintenance for Delta Faucets
Regular maintenance can help prevent many of the problems discussed above. Here are some tips:
- Clean the aerator regularly: Remove and clean the aerator every few months to prevent mineral buildup.
- Lubricate moving parts: Apply plumber’s grease to O-rings and cartridges periodically to keep them operating smoothly.
- Avoid harsh chemicals: Use mild soap and water to clean your Delta faucet. Avoid abrasive cleaners that can damage the finish.
- Address leaks promptly: Don’t ignore small leaks. Fixing them early can prevent more serious problems.
When to Call a Professional Plumber
While many Delta faucet repairs can be done by homeowners, some situations may require a professional plumber. Consider calling a plumber if:
- You’re uncomfortable working with plumbing.
- You’ve tried the above steps and the problem persists.
- You encounter complex plumbing issues.
- You’re dealing with a major leak or water damage.
By following these guidelines, you can effectively repair common issues with your Delta faucet and extend its lifespan. Remember to always prioritize safety and consult a professional if you’re unsure about any step in the repair process. Understanding how to repair your Delta faucet will save time and money. [See also: Identifying Your Delta Faucet Model] Knowing how to maintain your Delta faucet is also crucial. [See also: Cleaning and Maintaining Your Delta Faucet Finish] These repairs ensure that your Delta faucet will continue to function. The longevity of your Delta faucet depends on proper care. Even simple Delta faucet fixes can make a difference. Learning about your Delta faucet is helpful. Proper maintenance of your Delta faucet can prevent future issues. This knowledge will help you maintain your Delta faucet. Therefore, understanding how to repair and maintain your Delta faucet is key. Finally, remember that addressing issues early will help extend the life of your Delta faucet.
