The Ultimate Guide to Cedar Fence Stain: Protecting and Beautifying Your Investment
A cedar fence is a beautiful and durable addition to any property, offering privacy, security, and aesthetic appeal. However, like all wood, cedar is susceptible to the elements. Rain, sun, and fluctuating temperatures can cause it to fade, crack, and warp over time. This is where choosing the right cedar fence stain becomes crucial. Selecting the proper stain not only enhances the natural beauty of the wood but also provides essential protection against weathering and decay. This comprehensive guide will walk you through everything you need to know about choosing, applying, and maintaining cedar fence stain to ensure your fence remains a stunning feature of your landscape for years to come.
Why Stain Your Cedar Fence?
Before diving into the specifics of cedar fence stain, it’s important to understand why staining is so vital. Unprotected cedar, while naturally resistant to rot and insects, will eventually succumb to the elements. Here’s a breakdown of the key benefits of staining:
- Protection from UV Rays: Sunlight is a major culprit in wood degradation. UV rays break down the lignin in wood, causing it to turn gray and lose its structural integrity. Cedar fence stain with UV inhibitors helps block these harmful rays, preserving the wood’s color and strength.
- Prevention of Moisture Damage: Water is another significant threat. Excessive moisture can lead to warping, cracking, and rot. A quality cedar fence stain creates a water-repellent barrier, minimizing moisture absorption.
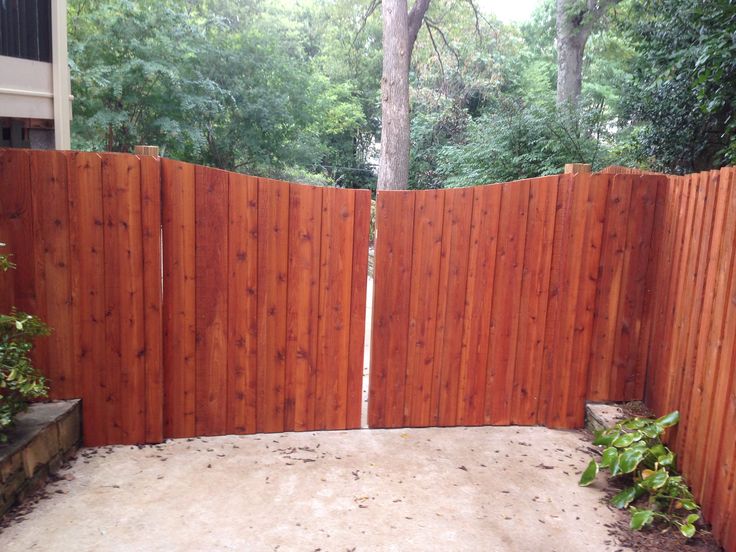
- Enhancement of Natural Beauty: Stain accentuates the natural grain and color variations of cedar, enhancing its visual appeal. You can choose from a range of colors and opacities to achieve your desired aesthetic.
- Prolonged Lifespan: By protecting against UV rays and moisture, cedar fence stain significantly extends the lifespan of your fence, saving you money on repairs and replacements in the long run.
Types of Cedar Fence Stain
The world of cedar fence stain can seem overwhelming, with various types and formulations available. Understanding the differences between them will help you make an informed decision.
Oil-Based Stains
Oil-based stains penetrate deeply into the wood pores, providing excellent protection and durability. They are known for their rich color and ability to enhance the natural grain of cedar. However, they tend to dry slower than water-based stains and may require mineral spirits for cleanup.
Water-Based Stains
Water-based stains are gaining popularity due to their ease of use, low VOC (volatile organic compounds) content, and quick drying time. They are also more environmentally friendly than oil-based stains. While they may not penetrate as deeply as oil-based stains, modern formulations offer excellent protection and color retention.
Solid Color Stains
Solid color stains offer the most opaque coverage, completely concealing the wood grain. They are ideal for fences that have already suffered some damage or for those who prefer a uniform color. Solid color stains provide excellent protection against UV rays and moisture.
Semi-Solid Stains
Semi-solid stains offer a balance between solid and semi-transparent stains. They allow some of the wood grain to show through while still providing good color coverage and protection. These are a popular choice for those who want to enhance the natural look of cedar without completely obscuring it.
Semi-Transparent Stains
Semi-transparent stains allow the most wood grain to be visible, enhancing the natural beauty of cedar. They offer less color coverage than solid or semi-solid stains but still provide good protection against UV rays and moisture. These are best suited for new or well-maintained cedar fences.
Transparent Stains
Transparent stains, also known as clear sealers, offer minimal color and primarily focus on protecting the wood from moisture and UV damage. They are ideal for those who want to preserve the natural color of cedar and don’t want to add any additional tint.
Choosing the Right Cedar Fence Stain: Factors to Consider
Selecting the best cedar fence stain for your project involves considering several factors:
- Climate: If you live in an area with harsh weather conditions, such as extreme sun, rain, or snow, choose a stain that offers maximum protection against these elements. Oil-based stains are often a good choice for harsh climates.
- Desired Appearance: Consider the look you want to achieve. Do you want to highlight the natural grain of the wood, or do you prefer a uniform color? Your desired appearance will influence the type of stain you choose.
- Condition of the Fence: If your fence is new, you can use a semi-transparent or transparent stain to enhance its natural beauty. If your fence is older or has some damage, a solid color stain may be a better choice.
- Budget: The cost of cedar fence stain can vary depending on the type and brand. Set a budget before you start shopping to help narrow down your options.
- Ease of Application: Consider your experience level and choose a stain that is easy to apply. Water-based stains are generally easier to work with than oil-based stains.
- VOC Content: If you are concerned about the environment, choose a stain with low VOC content. Water-based stains typically have lower VOCs than oil-based stains.
Preparing Your Cedar Fence for Staining
Proper preparation is essential for achieving a professional-looking finish and ensuring the longevity of your cedar fence stain. Here’s a step-by-step guide:
- Clean the Fence: Remove any dirt, mildew, or loose debris from the fence using a pressure washer or a scrub brush and a mild detergent solution. Be careful not to damage the wood with excessive pressure.
- Repair Any Damage: Replace any damaged or rotten boards. Tighten any loose screws or nails.
- Sand the Fence: Sanding helps to create a smooth surface and allows the stain to penetrate evenly. Use a medium-grit sandpaper for new fences and a coarser grit for older fences.
- Apply Wood Brightener: Wood brightener helps to restore the natural color of cedar and remove any stains or discoloration. Follow the manufacturer’s instructions for application.
- Allow the Fence to Dry: Ensure the fence is completely dry before applying the stain. This may take several days, depending on the weather conditions.
Applying Cedar Fence Stain: A Step-by-Step Guide
Once your fence is properly prepared, you’re ready to apply the cedar fence stain. Here’s a step-by-step guide to help you achieve a professional-looking finish:
- Choose the Right Weather: Avoid staining on hot, sunny days or when rain is expected. The ideal temperature range is between 50°F and 80°F.
- Gather Your Supplies: You’ll need a brush, roller, or sprayer, a paint tray, drop cloths, painter’s tape, and safety glasses.
- Protect Surrounding Areas: Cover any plants, shrubs, or other surfaces that you don’t want to get stained with drop cloths or plastic sheeting.
- Apply the Stain: Start by applying the stain to the edges and corners of the fence with a brush. Then, use a roller or sprayer to apply the stain to the larger surfaces. Work in small sections and overlap each stroke to ensure even coverage.
- Back-Brush: If you’re using a sprayer, back-brush the stain immediately after application to work it into the wood pores and prevent runs or drips.
- Apply a Second Coat (Optional): Depending on the type of stain and the desired color intensity, you may need to apply a second coat. Allow the first coat to dry completely before applying the second coat.
- Clean Up: Clean your brushes, rollers, or sprayer with the appropriate cleaner (water for water-based stains, mineral spirits for oil-based stains). Dispose of any used rags or applicators properly.
Maintaining Your Stained Cedar Fence
To keep your cedar fence stain looking its best and protect your investment, regular maintenance is essential. Here are some tips:
- Inspect the Fence Regularly: Check for any signs of damage, such as cracks, chips, or peeling stain.
- Clean the Fence Annually: Remove any dirt, mildew, or debris with a mild detergent solution and a scrub brush.
- Touch Up Any Damaged Areas: Repair any damaged areas with a matching stain.
- Re-Stain as Needed: Depending on the type of stain and the weather conditions, you may need to re-stain your fence every few years.
Choosing the right cedar fence stain and following proper application and maintenance procedures will ensure that your fence remains a beautiful and functional part of your property for many years to come. By understanding the different types of stains, considering the factors that influence your choice, and taking the time to prepare and apply the stain correctly, you can achieve a professional-looking finish that protects your investment and enhances the beauty of your landscape. Remember to prioritize safety during the staining process and always follow the manufacturer’s instructions for the specific stain you are using. With a little effort and attention to detail, you can enjoy a stunning and long-lasting cedar fence that adds value and curb appeal to your home.
[See also: Best Fence Styles for Your Home]
[See also: How to Repair a Damaged Wood Fence]
[See also: Choosing the Right Wood for Your Fence]
